Window coverings and drapes are an important element of every room that has windows. Whether for privacy, light control, insulation or to enhance your home’s decor, window coverings are an essential part of room design.
Aside from their function, drapes and/or curtains can really help to make a space feel complete by adding warmth and texture to a room. However, one of the most important aspects to consider when choosing drapery for your home is light filtration. In a room where you want lots of natural light to shine in, you’ll want to choose sheer or light filtering drapes. Conversely in a room where you want to block light (such as a bedroom) from coming through, room darkening drapes or blackout drapes would be best.
Ok so now you have a quick rundown about which drapes to select, but how do you hang them? That’s what we’re discussing today.
Here are 3 Tips to Hang Drapes Right:

The way your drapery is hung can determine the way your space feels and impact the overall aesthetic so it’s important you get it right. Here are 3 tips to ensure you hang drapes the right way to achieve a beautiful result.
DRAPERY RODS
As a general rule, a drapery rod should be installed so that it is 20% wider than the width of the window This will allow for an appropriate amount of stack back for the drapes.
[Pin it!]

If the area you’re working with is small, a shorter rod span may be required. When that is the case, note that it will result in a portion of the window being covered by drapes even when the drapes are open.
PRO TIP: Make sure you are including the casing on both sides when measuring.
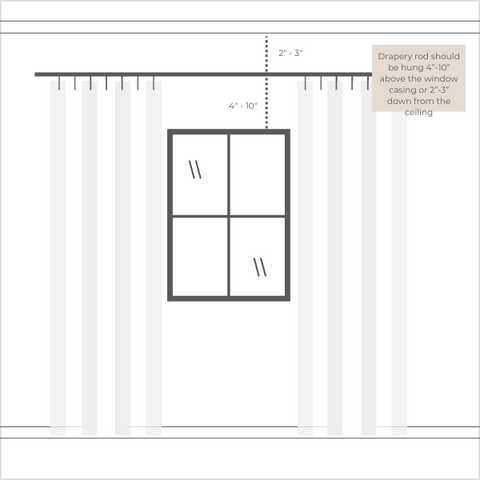
When considering how high to hang your drapes, we suggest hanging them as high as possible to fill out your space and give it more presence. If that’s not ideal for your particular situation, hang them at least high enough to cover the casing above your window.
A good rule of thumb is that your drapery rod should be hung so that it is 4”-10” above the window casing or 2”-3” down from the ceiling or crown moulding if a more impactful appearance is desired.
[Pin it!]
When calculating the drapery rod height, account for the length of the drapes (the bottom of the drapes should hang 0.5" from the floor if you’re using our preference - see below for other guidelines) and the ring and clip height if drapery rings and clips are being used. Rings and clips should be placed high enough that they clear the window casing.
[Pin it!]
DRAPERY LENGTH
There isn’t really a one-size-fits all when it comes to drapery and curtain length - but there are some suggested lengths to create different looks. Float length, floor length and puddle length. To create the most pleasing look for window drapes or curtains, use one of these drapery lengths.
Float Length - Choose a drapery length that is 0.5" to 1" off the floor. This helps to create an illusion of more space.
Floor Length - Choose a drapery length that kisses the floor (0.5” or less off the floor) when hung. This creates a classic look that is timeless.
Puddle Length - Choose a drapery length that is 1"-2" past the floor for a more relaxed look. This creates a more traditional look.
DRAPERY WIDTH
Just like determining how high to hang your drapes, determining how wide to position them is also important. A good rule of thumb is to use drapery panels that have a combined width of 2-3 times that of the window and rod to ensure proper fullness. NOTE: The fuller the drapes, the more formal/traditional they will appear, whereas, less full drapes have a more minimalist, contemporary vibe. Our preference is somewhere in between.
[Pin it!]

PRO TIP: There are some really great pre-made drape and curtain options out there but if you want the most beautiful overall aesthetic and quality, custom drapes are definitely the way to go. They can be quite an investment, but well worth it. Custom drapes are also a great route if your windows are not a standard shape or size.
So that's our top 3 tips to help you hang drapes the right way. Let us know if this helped you and if you have suggestions for further topics for us to discuss, send us a message. We’d love to hear from you.
 |
 |
| 1 | 2 | 3 | 4 | 1 | 2 | 3 | 4 |
 |
 |
| 1 | 2 | 3 | 4 | 1 | 2 | 3 | 4 |
As always, if you're looking for some home furniture and decor inspiration, check out our Home Décor Shop.
And if you’re looking to upgrade your space and take it to the next level, be sure to take the DIY Interior Design Course It teaches our entire design process step-by-step so you can execute a beautiful design in your home.
For more interior decorating and design inspiration, join our Design Tribe.
As always, thanks for reading and happy decorating!

Certified Interior Decorator, eDesigner & Founder
Orangetree Interiors
In case you missed it……
How High to Hang Lighting in Your Home
Virtual Interior Design Services Update
How to Style a Beautiful Bed in 5 Easy Steps
My Favourite Coastal Designs for 2022


