Ever wonder how to hang art correctly? Today I’ll educate you on vertical placement, horizontal placement and how to make a gallery wall. One of the most common areas of confusion when decorating is where to hang art. As a result, I'm providing you with some helpful guidelines to follow when hanging art in your space.
VERTICAL PLACEMENT (all rooms, excluding bedrooms)
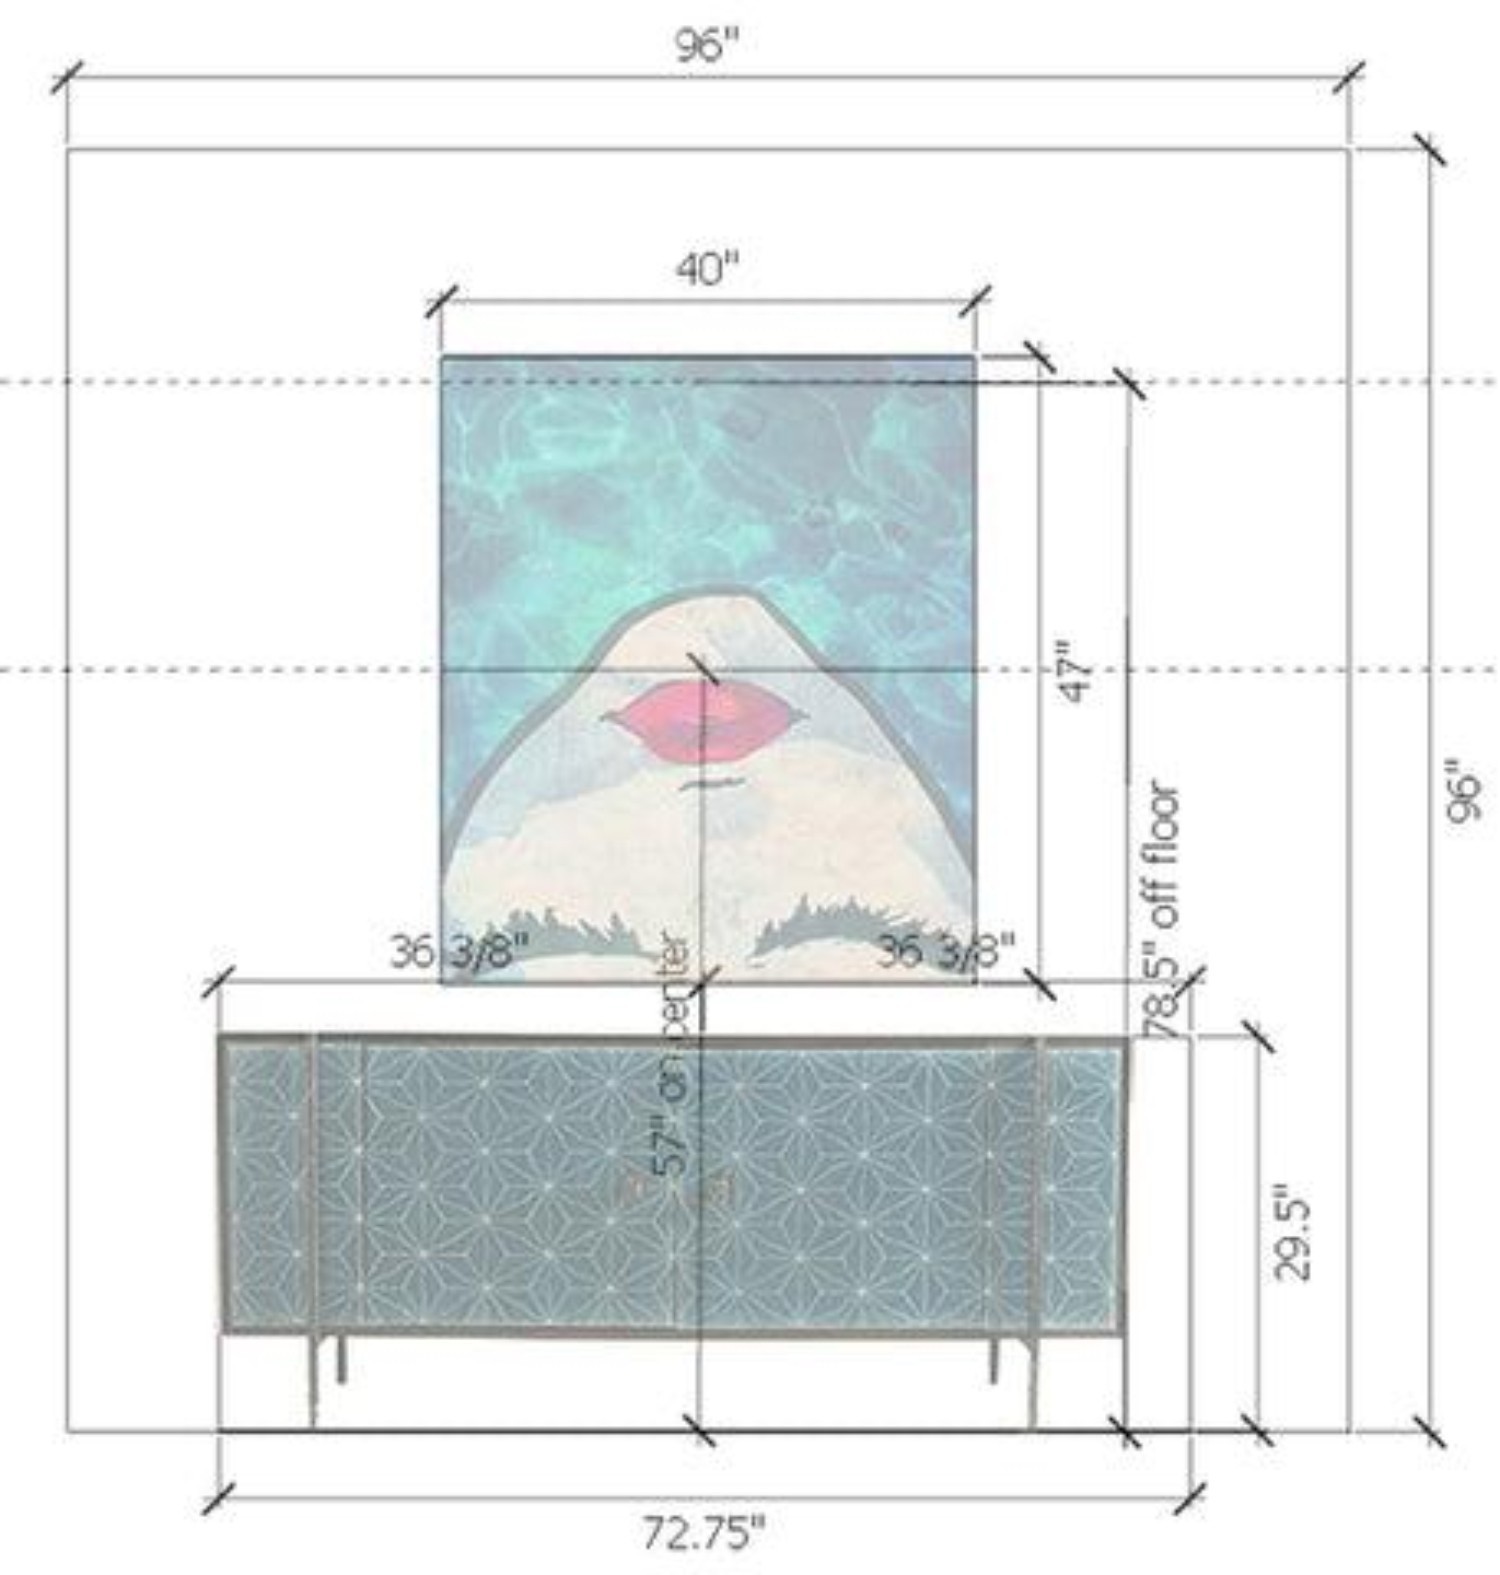
Always remember the phrase; 57” on center. What does 57” on center mean? It means that art should be hung so that its center is viewed at 57” off the floor. See the following example using a 47”H x 40”W piece of art to better explain the scenario.
Measure the height of your art (in this example we know the height is 47”)
Divide the height of your art/photo frame by 2 (47” divided by 2 = 23.5”)
Measure the distance from the top of the art to the top of the hanging hardware or wire on the back of the art (this should be no more than a few inches – in this example, the top of the hanging wire is taut at 2” from the top of the art)
Next subtract 2” (the distance from the top of the art to the top of the hanging hardware or wire) from 23.5” (half the height of the art) to get 21.5”
Next add the 21.5” to 57” to determine the 57” on center of the art (in this example 57” + 21.5” = 78.5”)
Now we know that the art should be hung 78.5” off the floor so that the center height of the art lies at 57”. Mark the placement on your wall using painter’s tape and/or a pencil so you know where to place your hanging hardware, screws or nails, etc.
It’s important to hang art at this height to help keep room designs feeling cohesive. 57” on center is average eye level and therefore is an ideal reference point for hanging art and photos. This standard applies to almost every size of art.
Watercoveted Graphic Art Print on Canvas by Oliver Gal
Boro Star Console by Tracey Boyd
VERTICAL PLACEMENT (bedrooms)
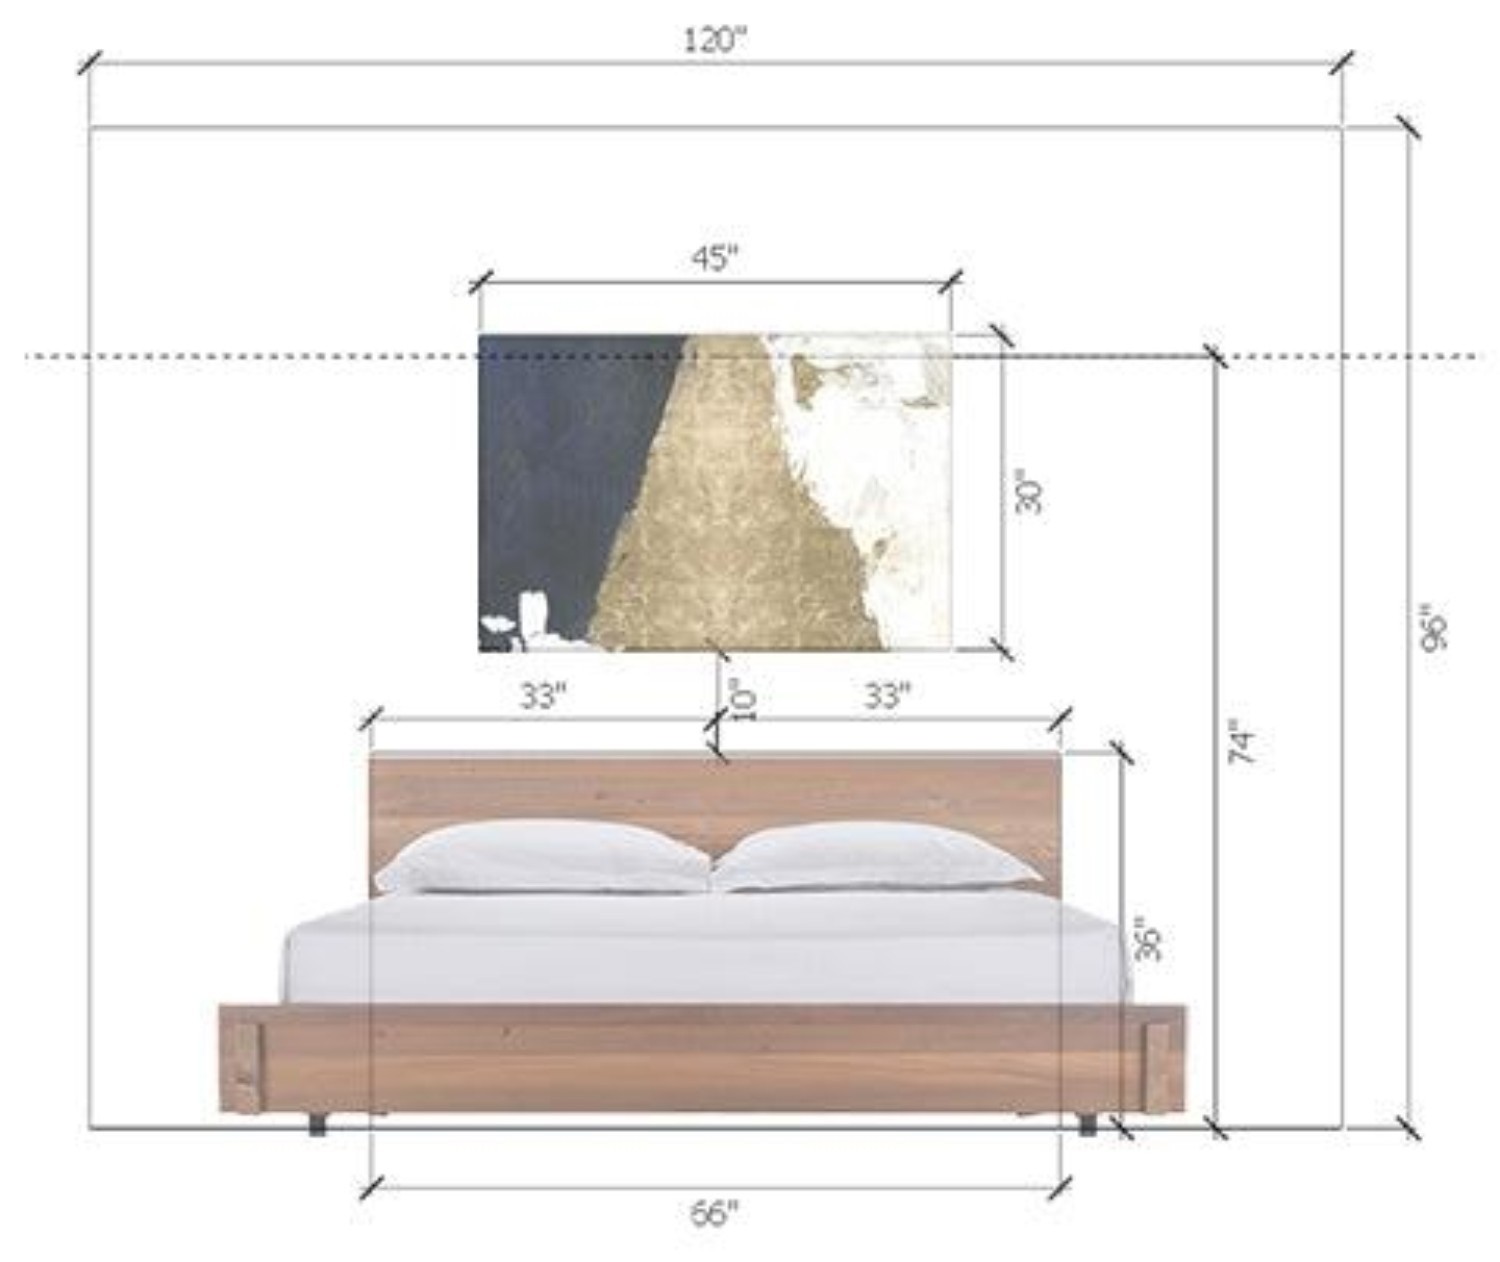
Typically a bed is the focal point of a bedroom. Therefore, it’s best to highlight it with art if the headboard isn’t dramatic enough. When hanging art above a bed, it’s best to hang it so that the bottom of the art or frame lies 8-10” above the top of the headboard. A larger gap can make the art feel disconnected from the bed. Here is an example using a 36”H headboard and a 45”W x 30”H piece of art to better explain the scenario.
Measure the height of your headboard (in this example we know the height is 36”)
Add 8-10” to this height to accommodate the gap between the top of the headboard and the bottom of the art (36” + 10” = 46”)
Now measure the height of the art (in this example we know the height is 30”)
Measure the distance from the top of the art to the top of the hanging hardware or wire on the back of the art (this should be no more than a few inches – in this example, the top of the hanging wire is taut at 2” from the top of the art)
Next subtract 2” (the distance from the top of the art to the top of the hanging hardware or wire) from 30” (the height of the art) to get 28”
Add the 28” to 46” to determine the height at which to hang the art (in this example 28” + 46” = 74”)
Now we know that the art should be hung 74”off the floor so that the bottom of the art is 10” above the top of the headboard. Mark the placement on your wall using painter’s tape and/or a pencil so you know where to place your hanging hardware, screws or nails, etc.
NOTE – If hanging art in any other part of your bedroom, follow the guidelines listed in the vertical placement for all rooms section mentioned above.
"Night and Day" print of painting on wrapped canvas by Willa Arlo Interiors
Reclaimed Teak Bed
HORIZONTAL PLACEMENT (all rooms)
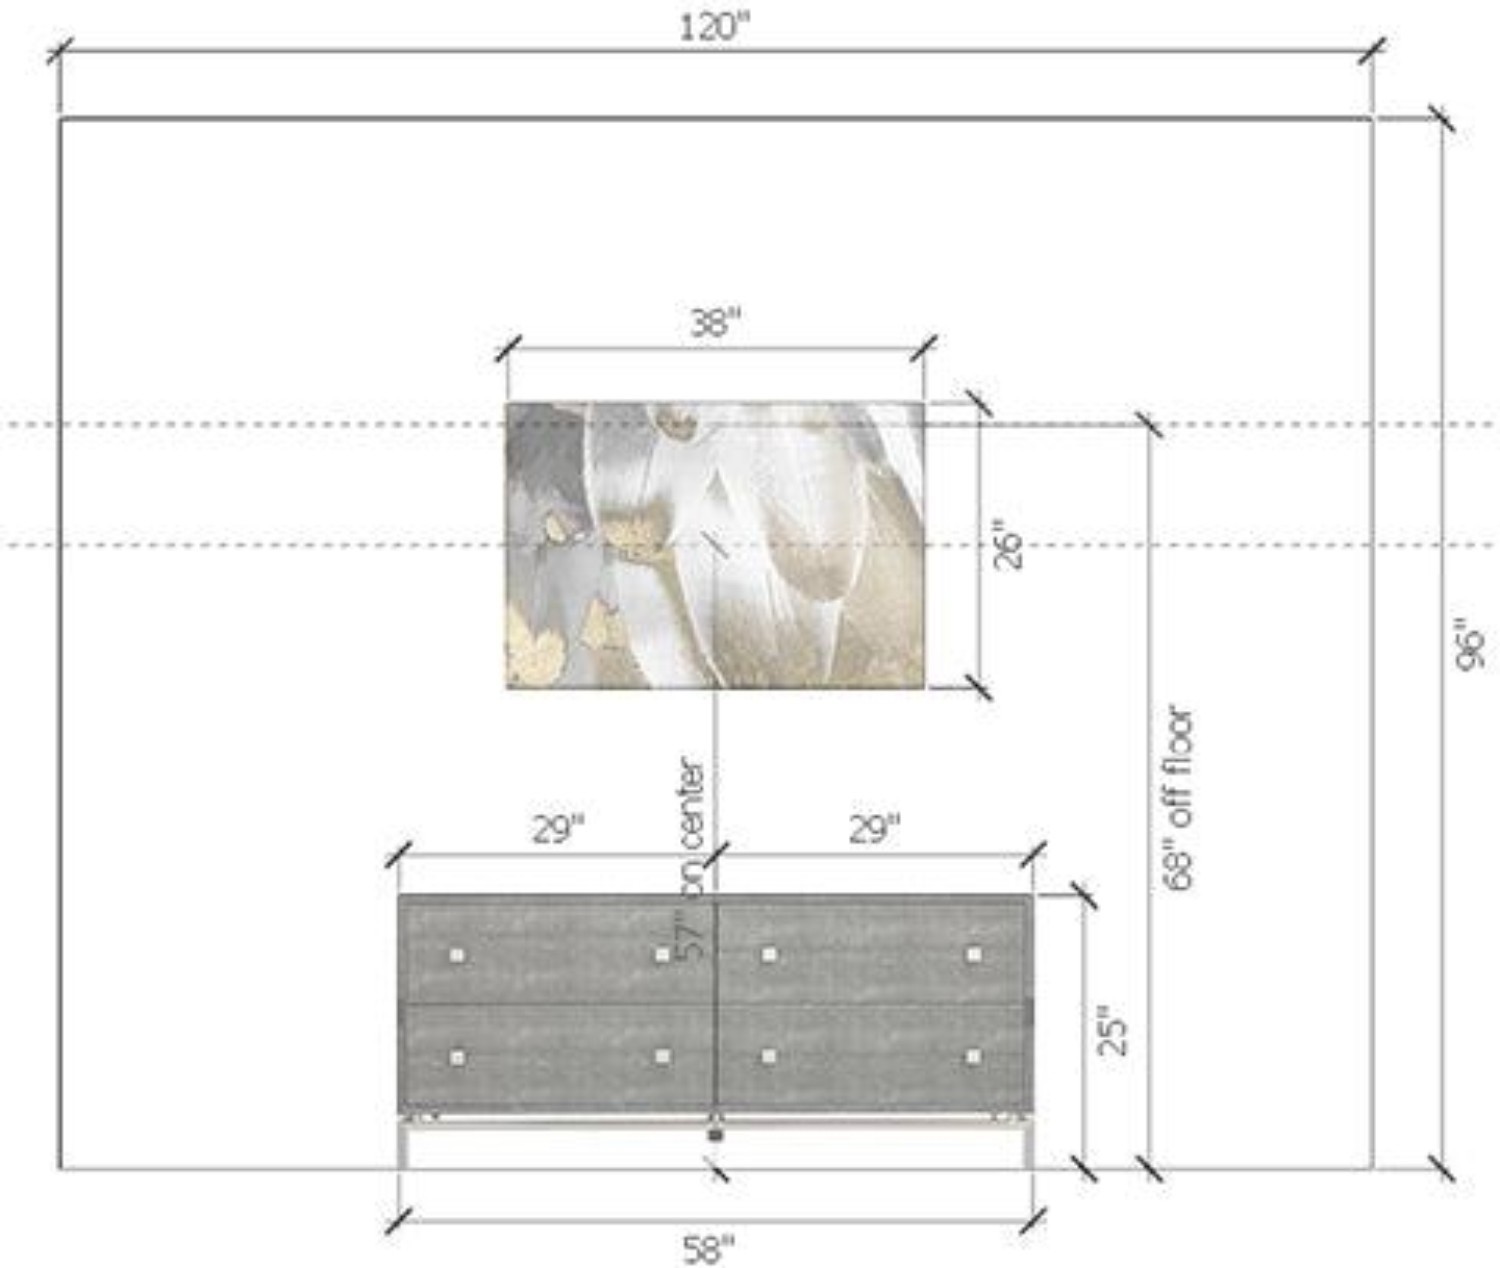
Art over furniture should be centered horizontally over the furniture. Here’s an example using a 58”W dresser to better explain the scenario.
Measure the width of your furniture (in this example we are using an 58” wide dresser)
Divide the width of your furniture piece by 2 (58” divided by 2 = 29”)
We now know that the center of the dresser is at 29”
Therefore, we know that the art should be hung 29”in from the left and right of the dresser. Mark the placement on your wall using painter’s tape and/or a pencil so you know where to place your hanging hardware, screws or nails, etc.
Royal Feathers Graphic Art Print by Willa Arlo Interiors
Shageen Embossed Low Dresser
GALLERY WALLS
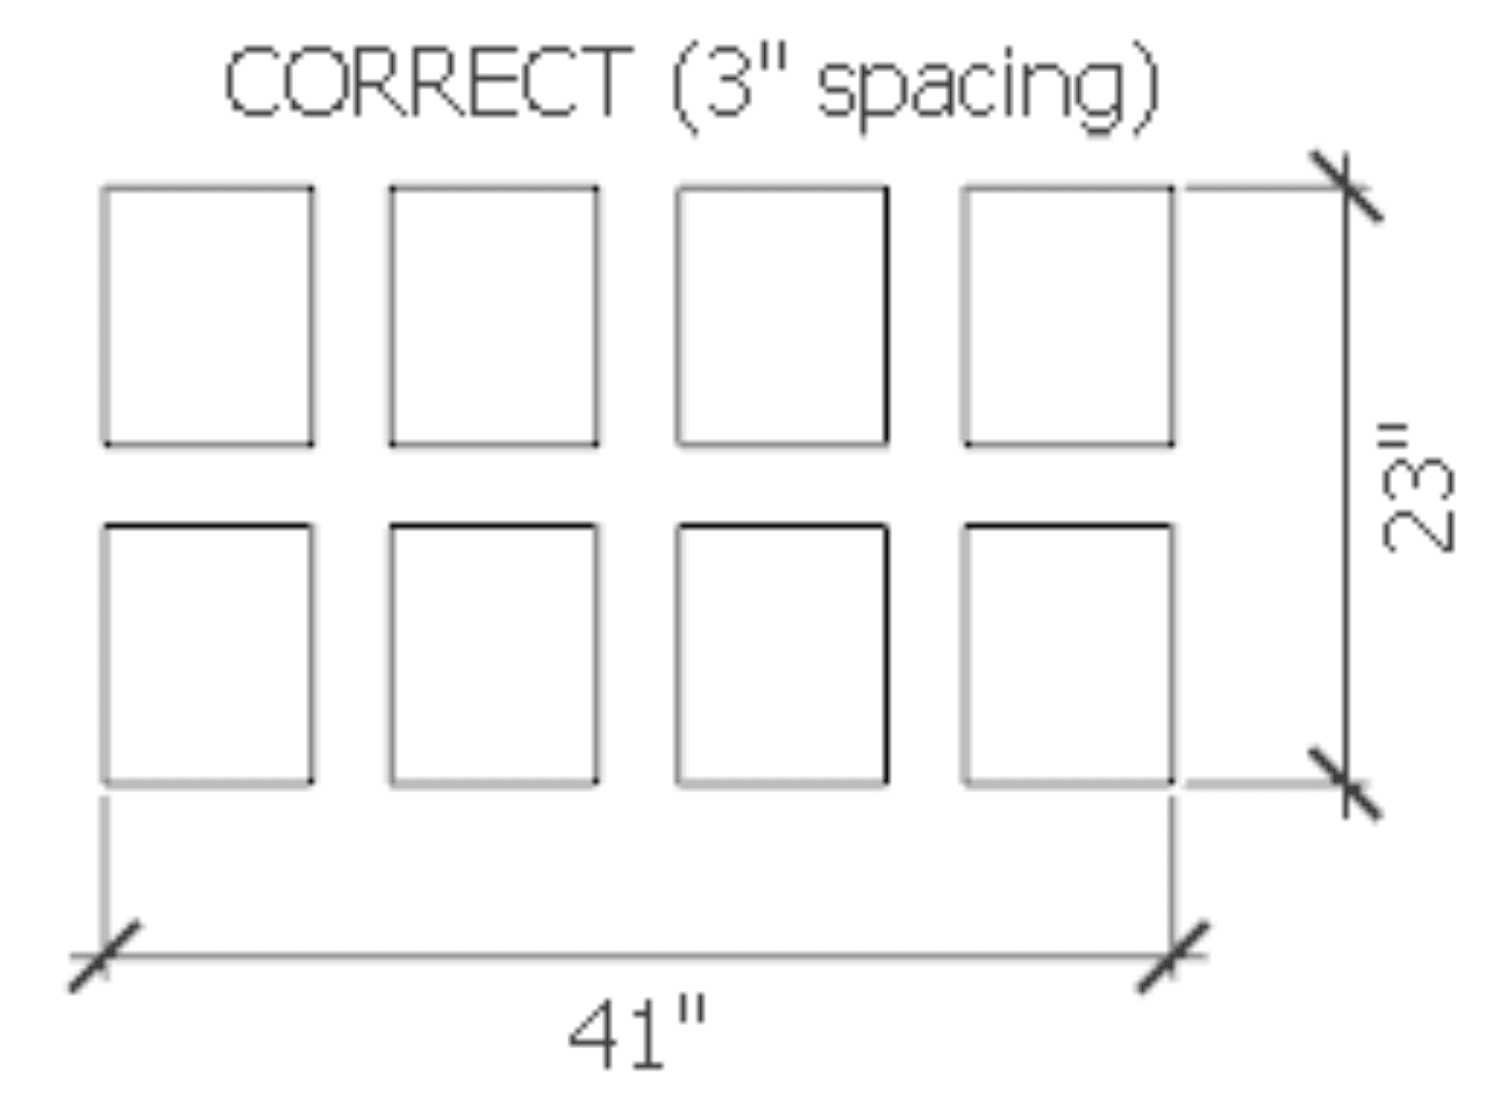
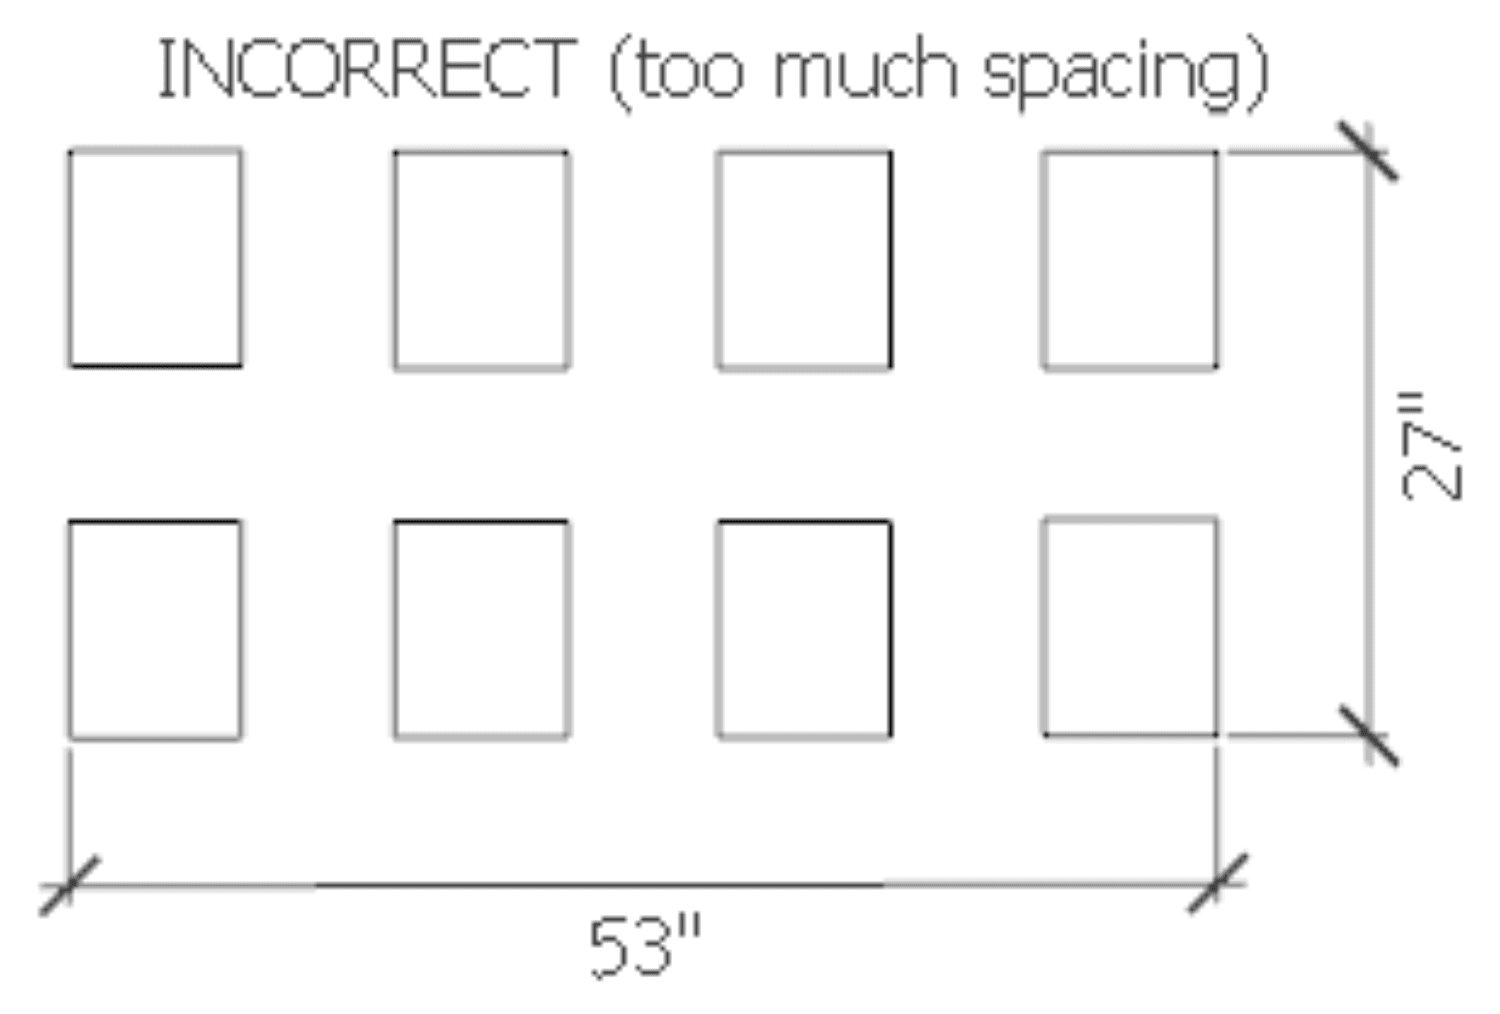
The above rules apply to groups of art as well. When hanging more than one piece together, think of each piece as part of a group. Then think of the group as ONE piece of art. When arranging each piece of art, make sure not to exceed 6” of space between each item; doing so will make the group feel disconnected. Instead opt for a 2-3” gap of space between items to ensure they feel like they belong together. See the following example using eight pieces of art that are 8”W x 10”H each and hung in two rows and four columns.
Add the widths of your art together (in this example 8” + 8” + 8” + 8” = 32”W because we are doing two rows of four)
Decide how much space you’d like between the pieces (ideally 2-3” and no more than 6”)
Add the width of the group of art (32”) to the space between each piece (we’ll use 3”) to determine the entire width of the group (32” + 3” + 3”+ 3” = 41”). Total art group width is 41”
Next, add the heights of your art together (in this example 10” + 10” = 20”H because we are doing two rows of four)
Add the height of the group of art (20”) to the space between each piece (we’ll use 3” again) to determine the entire height of the group (20” + 3” = 23” because we are doing two rows of four). Total art group height is 23”
Now we know that the size of the group of art is 41”W x 23”H
Follow the vertical placement and horizontal placement rules above to accurately place your art pieces. Mark the placements on your wall using painter’s tape and/or a pencil so you know where to place your hanging hardware, screws or nails, etc.
Quick Tip – You may find it helpful to draw your art placement out on Kraft paper or on the back of some wrapping paper before you start marking up your wall. Place the Kraft paper or wrapping paper on the floor so that you can measure and draw your layout confidently. Once satisfied, use painter’s tape to fasten your layout to the wall so that you can make where to hang each art piece.
HARDWARE FOR HANGING ART
Now that you know where you’ll be placing your art, you need to hang it. If you’re hanging your art on drywall you should know that drywall is typically weak and therefore may need some reinforcement when it comes to hanging your art. Choose the following hardware for hanging art depending on your wall material.
Drywall or Plaster - Use picture hangers with nails or wall anchors with screws
Wood – Use nails or wood screws
Brick or Concrete - Use lead wall anchors, screws and power drill with a carbide tipped bit
TOOL PREPARATION
Before putting your room design together, it’s always best to gather all of the necessary
tools required to make for a smooth process and avoid unnecessary frustration. Here is a list of tools to help you hang your art.
Recommended:
Tape Measure
Hammer and nails OR screwdriver and screws
Level (one that is 24” long is optimal)
Painter’s tape
Pencil
Optional:
Picture hanger hardware OR D-rings for hanging heavy art
Lead wall anchors and power drill if your interior walls are brick or concrete
Wrapping paper or Kraft paper to help with art and/or photo collage arrangement
Vacuum and/or broom to help with clean up as you move furniture pieces around
I hope these tips help you create a more visually appealing space. If you have any questions, please feel free to ask them in the comment section below or contact Orangetree Interiors directly; we will gladly help you. Until next time, have a fab weekend!
Let's talk about your project. No pressure, no obligation, just a friendly conversation about your vision and how we can help bring it to life.