Today's blog is for the DIYers out there. If you're decorating a room in your home, one of the most important things to consider are the dimensions of the space to ensure that the furniture and decor that you purchase will fit well and function optimally.
For this reason, today I'm sharing How to Properly Measure a Room for Your Interior Decorating Project.
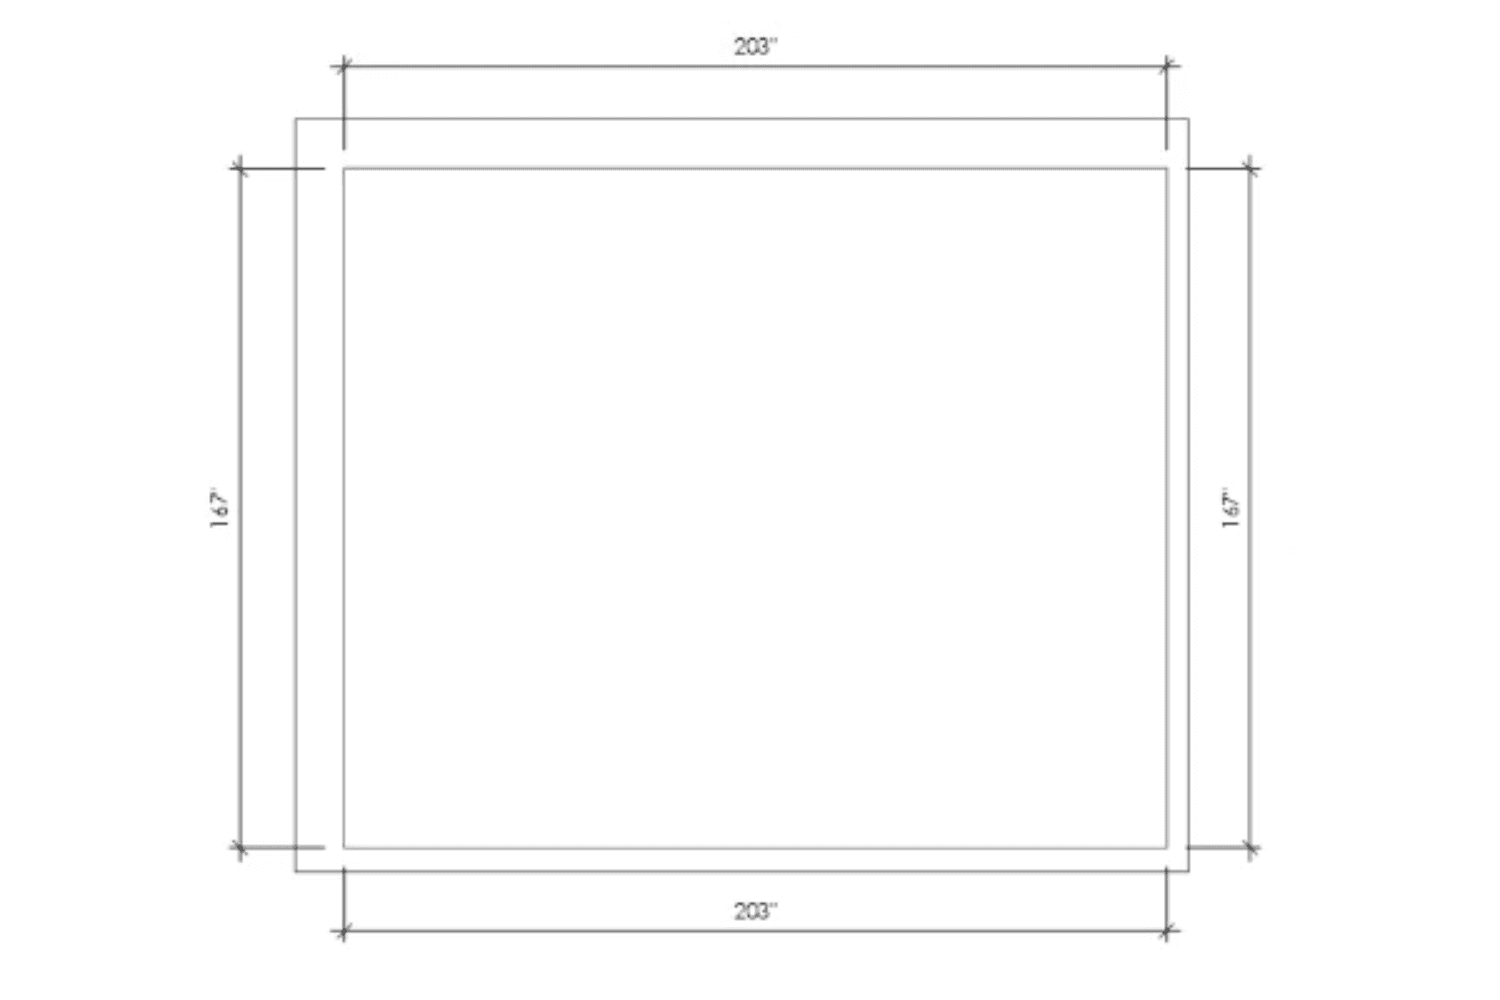
STEP 1 | MEASURE THE PERIMETER
Measure the perimeter of your room starting with the longest wall first and measuring left to right. Don't worry about windows and doors/doorways right now; just take the overall room dimensions. For the most accuracy, take measurements on a flat surface rather than letting the measuring tape float in the air.
OPTIONAL: Use graph paper to better represent the scale of your room
TIP: Use imperial measurements. It's best to record measurements in all inches and use decimals, rather than a combination of feet/inches and fractions. Using inches only with decimals (eg. 138.5", rather than 138 1/2") will make math easier later when confirming your dimensions after measuring. If your math is wrong, remeasure the room.
Perimeter Dimensions
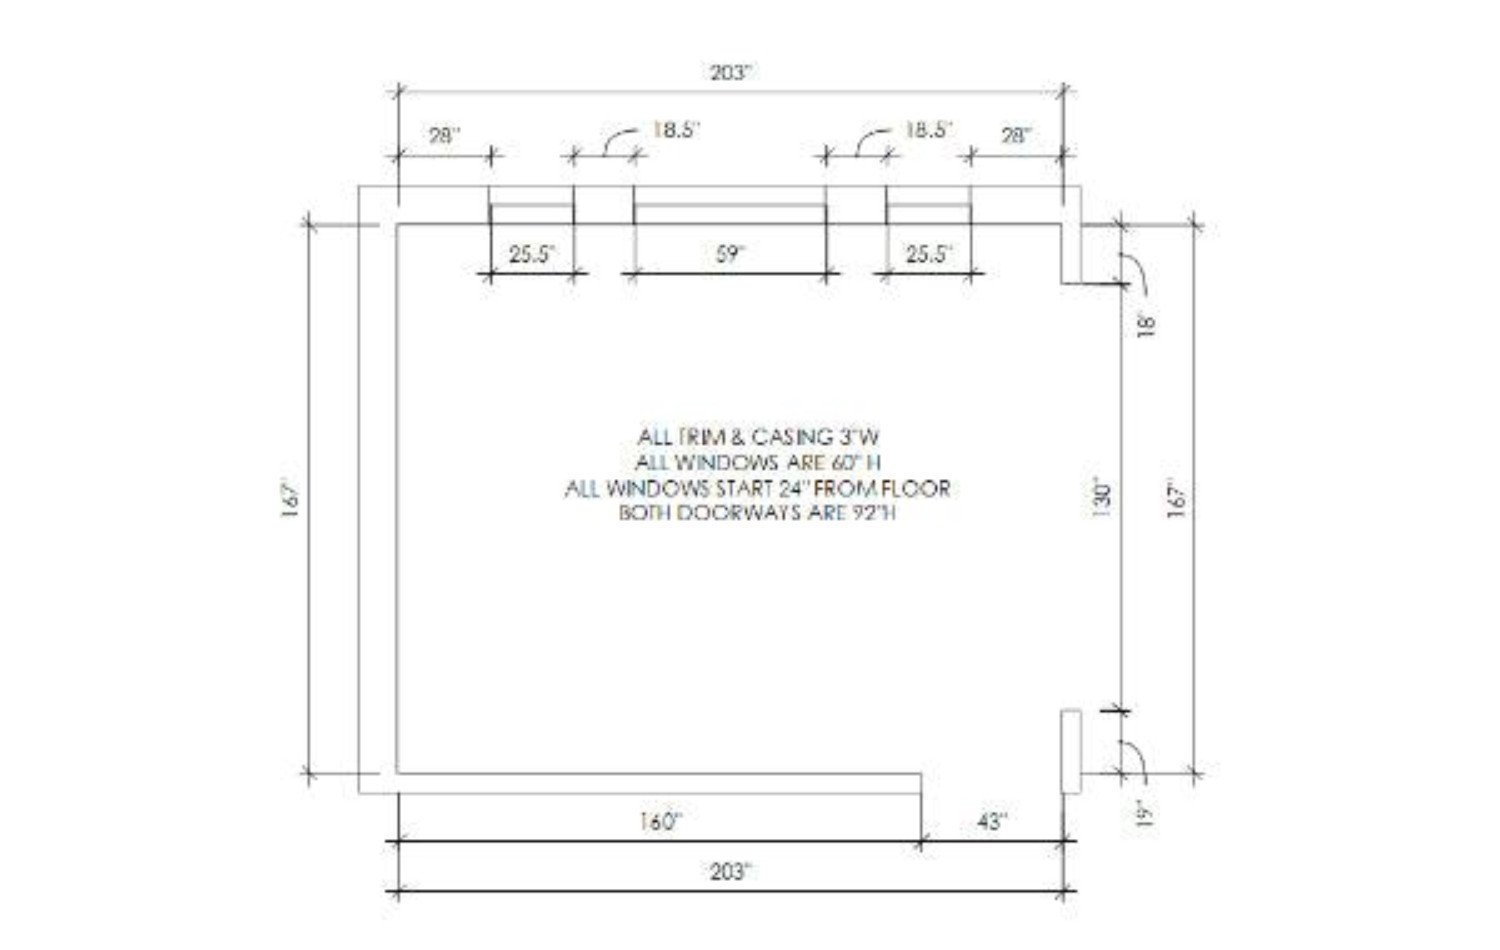
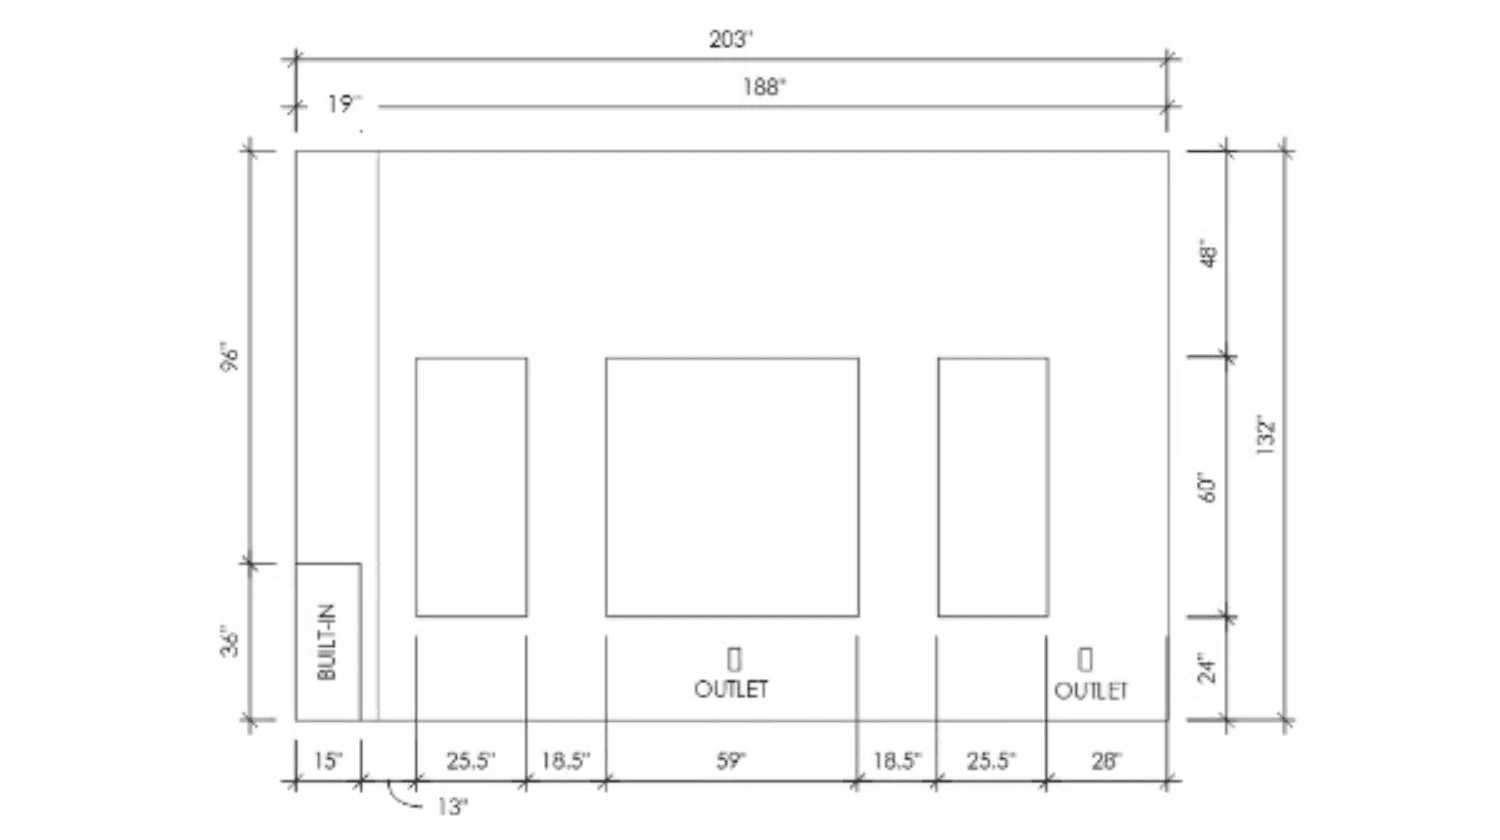
STEP 2 | NOTE WINDOWS & DOORS
Note window and door/doorway (w/d/dw) placement on your drawing as well as door swings if applicable. Choose a wall to start with and work your way clockwise around the room. Label your walls as you measure to avoid confusion (eg. patio wall, bay window wall, etc).
When measuring, start at a corner and measure to the frame of the w/d/dw. Record the measurement. Next measure the w/d/dw from inside frame to inside frame, (left to right & up and down). Record the measurements. Do NOT include the trim or casings in your measurements yet. Instead note them on the drawing once all measurements have been taken (eg. window trim 3", door casing 3", crown moulding 5"). Lastly, note the door/doorway heights (eg. door is 80"H) and the window elevations from the floor (eg. bottom of window is 36" from floor).
Room Dimensions with Windows & Doors Noted
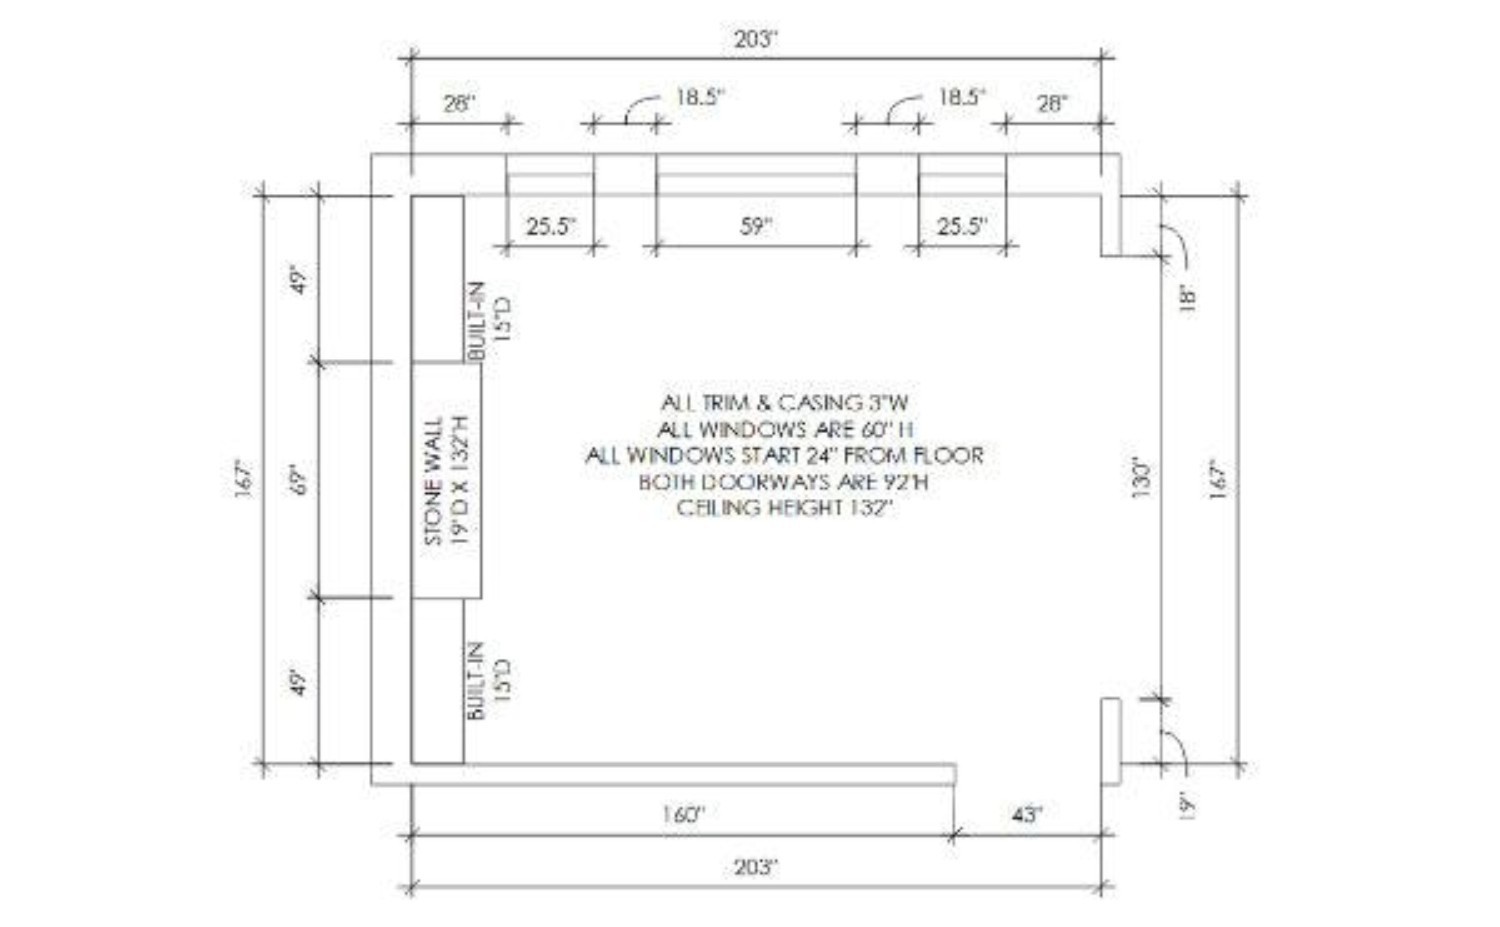
STEP 3 | MEASURE OTHER ELEMENTS
Once you have your perimeter measurements and all windows and doors in place, go back and measure any other structural elements in the space (eg. fireplace, built-in cabinets, etc). Choose the nearest corner to the structural element as a starting point. Measure from the corner to the outside of the structure and record the measurement. Measure the structure itself (length, width, height and depth) and record those measurements. Note any elevations where applicable.
Finally, note the ceiling height, baseboard height, crown moulding (if applicable) and location of lights and switches, outlets, thermostats, vents, etc. on your drawing. For maximum accuracy, measure the location and elevation of each of these items using the method as described above.
Room Dimensions with Windows, Doors & Other Elements Noted
STEP 4 | DRAW ELEVATIONS
While a floor plan provides a birds eye view of a room, elevations provide a ground-level view of each wall. Elevations will make it easier to visualize the placement of windows, doors, structural elements, switches, etc. in your space.
Draw elevations for each wall that has a unique element. Use one sheet of paper for each wall. Make sure to label each wall to match with the labels you created in step two.
Use the ceiling height and wall measurements you've already taken to draw the outline of each wall elevation. Then using all of your other measurements, add the windows, doors, structural elements, outlets, switches, vents, etc. onto the corresponding paper.
Window Wall Elevation
STEP 5 | REPEAT
Repeat drawing elevations for all of the walls in the room.
Viola! Now you should be in a great position for furniture layout and space planning for your interior decorating project.
Let's talk about your project. No pressure, no obligation, just a friendly conversation about your vision and how we can help bring it to life.